/coffee/getting-started
Guide - Pour Overs 101
Getting started with Pour Overs.
How to get your first good brew
Essentials
- Grinder and the coffee you use are going to be the biggest contributing factors to your coffee taste.
- Water comes in second, and then the dripper + technique + filters are all important factors but not as impactful.
- Please buy a scale. It’s hard to be consistent without one.
- Water temperature does matter, but if you don’t have the budget, I recommend boiling water, then waiting around 30s to cool down. If it has a thermometer, you want it probably around 96 C when you start pouring.
Getting started
- Go to https://honestcoffeeguide.com/coffee-grind-size-chart/ - Find your grinder, and look at what the range of pour overs are.
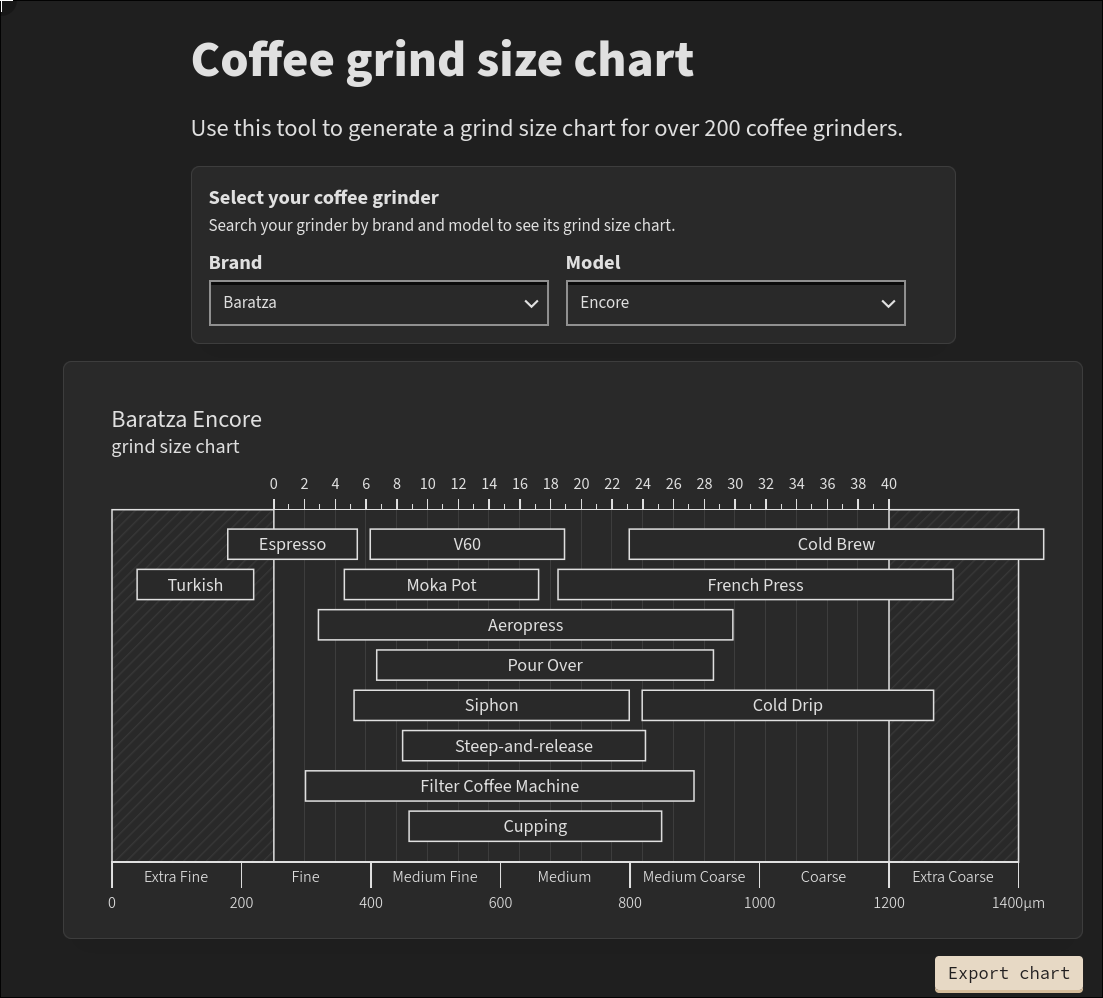
For example, for Baratza Encore, it’s 8 to 28. However, this is just the possible factors. You generally want to start coarser, then make your way finer until you find the brew taking too long.
The extreme coarse side is generally reserved for dark roasts, so I recommend starting somewhere about half way to about 70% of the way for medium/light. So somewhere around 20-24 is probably ok.
Grind your coffee, setup your filter and dripper, and heat your water.
For light roasts (and maybe light-medium roasts), you can use this recipe to start out. This should mostly work for any dripper no matter what.
15g of coffee

0:00 - 1:00 - 60g of water
1:00 - 1:30 - 100g of water (total 160g)
1:30 - ??   - 100g of water (total 260g)
# if you're using a more medium/darker roast, you should probably stop at around 240-250g instead.

20g of coffee recipe
0:00 - 1:00 - 80g of water
1:00 - 1:40 - 120g of water (total 200g)
1:30 - ??   - 120g of water (total 320g)
Basic Pouring technique - try to pour the amount within the 10-15s after the pour starts. Don’t pour on the edges of the dripper, do circles around the center.
An alternative brew you can try with basically any brewer (From James Hoffman). The concept is basically every 30 seconds, you want to pour 50g of water until you get to your designated amount. For 15g, do it until 250g. for 20g, do it until 250g, then add 70g as the last pour.
Time of brew
Brew times are simply there as a guidance for replicating similar brews. In reality, they’re not indicative of whether a brew was good or not. But to keep things simple, we’ll have to use time as the main factor.
For 15g of coffee, you generally end up around the 2:30 to 4:30 mark. It’s a wide range because it really depends on what flavor you’re going for and the bean you have. If it’s too fast or too slow, you’ll need to adjust your grind size. if it’s too fast, make it finer. If it’s too slow, make it coarser.
Clogging
Clogging is usually referred to when you see liquid above your coffee bed, but the coffee is “dripping” out of your filter rather than running through it. Particularly pretty slowly. Generally this can be fixed with grind size, but if you find yourself going too coarse and it’s still clogging…
- Filter paper - Not all filter paper are the same. The default filter paper that comes with the V60 for example is notorious for clogging. You may want to consider using a different filter paper.
- Grinder is malfunctioning / poorly calibrated - Grinders can get misaligned especially if you took it apart recently. That will cause your grind size to not be accurate.
Adjusting based on taste
You taste your coffee and you think it might taste way too bitter than usual or way too sour than usual even though you did everything right and the time looks fine.
- Coffee freshness. Is it old? (like 3months+)
- Older coffee is still usable. Maybe try with 1-2 more grams of coffee and see if it improves. (same water recipe)
- Grind size.
- If it tastes mostly just bitter with no sourness, you can try to make the coffee coarser.
- Basically you want to make the water stay in the coffee less as a way to reduce bitterness.
- If it tastes mostly sourness without bitterness, you can try to make the coffee finer.
- You want to make water stay in the coffee longer so it doesn’t taste thin.
- If it tastes mostly just bitter with no sourness, you can try to make the coffee coarser.
- Water Ratio
- You can try less water if the coffee tastes sour/thin
- I don’t recommend adding more water. Usually you’re doing this to push extractions. There’s a lot of other things you can do to improve extraction before trying to push the ratio.
Getting more into it.
You’ve made a few brews, now you want to get better.
Water Quality
Assuming you’re already using a decent grinder (pretty easy nowadays with about a budget of 50-100$ for handgrinders, and around 200$ for electric ones), the next thing you’ll want to check is if your water quality is ok.
The easy way is to buy a water PPM tester - https://www.amazon.com/s?k=water+ppm+tester
PPM is simply “parts per million” which isn’t indicative of what actual minerals are in your water, but generally speaking, having too much minerals often makes the coffee taste bland, and the taste of the water will usually end up overpowering the nuances of the coffee.
The minerals themselves aren’t too important at this stage, and basically you want to get something that’s reasonable decent and tasty.
If your water is around the 0-100 mark, you’re probably fine. 100-150 is probably not worth changing, and 200+ you might want to consider trying different water to see if you think it makes a difference.
Few options
-
Buy 1-2gal water + water mineral packets such as Third Wave Water https://www.amazon.com/Mineral-Enhanced-Optimizing-Brewing-Water/dp/B077JG9X8Y?s=hi (It uses 1gal-1packet ratio, but I find the ppm is too high, and I usually will dilute this 2:1 or 3:1).
- This is good especially as a test run if you want to experiment.
-
Do an RO (reverse osmosis system) + Water Packet
- More convenient, no wasted plastic.
- RO isn’t completely 0. It’s usually around 5-10 ppm, but it’s unnoticeable.
- Problem is that it’s pretty expensive up front cost, and RO isn’t a transparent process, it has throwaway water as part of the process, which means increased general water usage. An option is to hook the output into using it for plants because the water will be pretty mineral rich (and if your water is already pretty clean, then it’ll be amazing for plants).
-
(Not Recommended) Distill the water yourself - You’re crazy if you do this.
For minerals, there’s several different kinds. I would recommend starting with third wave water, and then go from there.
The biggest contributors to changing your water is going to be the overall mouthfeel, the lingering mouthfeel, and maybe some “brightness” to the taste.
Water Temperature (Part 1: Control Variable)
This is a short one:
Controlling the temperature to be stable using something like the Fellow Kettle is mostly so that you’re able to replicate the results more consistently. If you don’t have a temperature-controlled kettle, it will be helpful to have one to be more consistent with brewing.
Since this involves buying a new kettle, another thing to consider is that some of the newer kettles will have like “pour flow control”, which can be pretty convenient. If you want to spend extra money, that’s something I would go for.
RDT (Ross Droplet Technique)
There’s a bit of real data nowadays, but it’s still mostly psuedoscience just because taste is often subjective in a lot of ways.
This technique is basically spraying your beans with water before putting in the grinder. You can use any atomizer spray to do this. I don’t know how true this is, but I would recommend using more closer to distilled for the water, since the water could end up affecting the metals of your grinder if it’s too mineralized.
Biggest benefit of doing this is that it reduces/remove all static in the beans when you grind it. Sometimes when you grind, you’ll end up with a bunch of coffee dust spitting everywhere near the exit of the coffee. This will often solve that problem.
The perceived taste benefit hypothetically is that the beans grind more consistently and has less unintentional fines, which are generally what cause those extreme unwanted notes of bitterness or astringency. This sort of depends on the bean and the grinder, so some may have a bigger difference than others.
Grinder and Coffee
WDT (Weiss Distribution Technique) / Wet WDT
Filter Papers
There are a lot of filter papers out there. There’s a lot of videos too.
Pouring Recipes
Pouring Technique
Water Temperature (Part 2: Flexibility)
Water Quality Part 2 (Minerals)
I’m not too well versed, but if you really want to dig into the weeds for this, I’ve been reading up on a guide made by another coffee fanatic in the Bay Area - https://www.robertasami.com/coffee/water-you-doing
Currently I’ve been enjoying Apex Lab and adding it post brew as a way to taste the before and after. Lotus Water is a nice way to learn the mineral differences.
Lance Hendrick has already made several videos as well on the topic, and hasn’t noticed any noticeable difference between adding minerals before and after (although it might just be that the minerals that are most commonly used for these are just not significantly affecting the brew chemistry)
https://www.youtube.com/watch?v=tiB6TpJRmOs